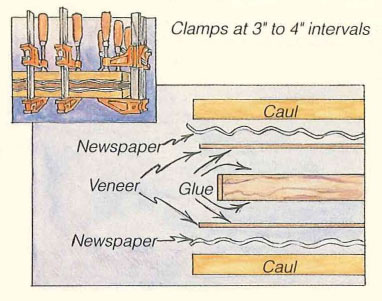
A Caul Applies Even Pressure On The Veneer
 What is a veneer caul and how do I use it?
When pressing a veneer, you need to apply even pressure along the entire surface. A caul is used to achieve this. Basically, it is a flat piece of wood that goes on top of the veneer. When the vacuum bag for instance, presses down, it will press on the caul which will then apply even pressure on the veneer.
How large should a veneer caul be?
Make the caul slightly larger than the project you are veneering. Half an inch larger on all sides is a good size. If it is too large, the caul will overhang the workpiece by more than ½” on any side.
While the workpiece in under pressure, the resulting force of the vacuum from the bag will either break off the overhanging area, or will put enough pressure on the overhanging areas causing the caul to bend (more pressure on the edges will lift the center of the caul off of the veneer), causing an area where the caul is no longer applying any pressure on the workpiece.
This problem will not occur when using manual clamps as opposed to a vacuum bag. However, it is nice to be able to see the edges of the workpiece. Too large a caul will overhang the piece and will make it more difficult to get clamps into place as well. Too small a caul, or one that is exactly the same size as the work piece will give you problems as you try to cover the entire working area.
What is the best material to use for a caul?
A good material to use when making a caul is ¾” melamine particle board. The thickness gives it strength to withstand any chance of breaking or bending if it overhangs the project by too much. A melamine surface, as opposed to uncovered MDF, is also a good choice because PVA glues do not stick to melamine. This avoids any chance of the workpiece sticking to the caul due to glue seepage.
In the picture above, you will notice that a sheet of newspaper was shown to go in between the caul and the veneer. The newspaper is to make sure thatthe caul does not get glued to the veneer. This step won’t be necessary if using a melamine caul.
Do I need a caul on the bottom and the top?
If you are veneering both sides of the substrate at once, you will need a caul for both sides. Depending on the method of applying pressure, you can use different setups. Although in general, it is not absolutely necessary to have a caul on the bottom as it will be pressed against the bottom of your press.
However, if you are using a vacuum press, chances are that the bottom of your press board will not be flat or smooth, it will have a grooved surfaced or channels cut into it, to allow for air to evacuate. It may have dried glue from a previous job, etc.
Additionally, a bottom caul, again slightly larger than the workpiece will catch any glue run out, saving you from potentially from the job of cleaning the glue from inside the veneer bag.
When using clamps, then effectively you will be using a caul for both top and bottom.
How do I make a veneer caul?
Unless every workpiece is the same shape and size, you should be making a new set of cauls for each project. Take your caul material, and cut it so that it is slightly larger on all sides than the project you are veneering.
If you are using a vacuum press, round the edges and corners of the caul by sanding or routing a smooth curved profile. Like chamfer. What you are trying to accomplish is a soft edge so that the vacuum bag does not get punctured on a sharp edge or corner as it compresses down.
If using clamps to apply pressure, then rounding the edges is not necessary.
So, in general, a proper veneer caul will be used to apply even pressure onto the workpiece. It can be made from any flat material that is thick enough not to bend under pressure from either clamps or a vacuum press. Cut it a bit oversize to your workpiece.
Melamine coated particle board is a great choice as it is inexpensive, glue won’t stick to it easily, it can be reused if the size is right, and won’t warp over time.
